Did you know that your iPhone 6 can save your life?
And it’s not just iPhones but any kind of smartphone, like the Samsung Galaxy, Droid Incredible or Windows Phone.
The secret is letting your phone do the talking for you in an emergency. And the way to do that, is with ICE.
What is ICE?
During Hurricane Katrina, so many people were injured & separated from their families, that emergency workers came up with the idea of putting an ICE â€" In Case Of Emergency â€" contact in their cell phones. Now, hospitals worldwide check patient’s phones for their ICE contact, to locate their next of kin.  In fact we suggest that everyone should have 2 ICE contacts on his cell phone, just in case the first person is unavailable.Â
And now, Apple has made putting an emergency contact on your iPhone 6, 6 plus and iOS 8 even easier, with their new Medical ID. Medical ID is a part of the Apple Health App. It not only gives you a place to put your emergency medical information, but it puts a link to that information right on the front of your phone, where it can be viewed by a hospital even if your phone is password locked. Â
But there is one catch. You still need to set up your ICE Contacts â€" the right way â€" to make sure that emergency personnel have all of the information they need to treat you with your medical needs in mind and to get the people you love to your bedside, quickly and easily.Â
And by the way, if you need instructions for your iPhone 5 click here , or your Samsung Galaxy, click here .
Grab Your Phone & Let’s Get Started
Before you begin, you’ll need to decide who your ICE Contacts will be.Â
The first one of course will be your spouse, partner, best friend or close relative. Someone that you want there with you at the hospital or, if need be, making decisions on your behalf.Â
But what if that person is also injured, or is out of town or forgot to charge their phone? Why not choose one additional person to be an ICE Contact â€" someone very close to you, who you know will drop everything to race to your side and handle things until your significant other can be reached.
Let’s set up your first ICE Contact.
Touch the Contacts Icon on your iPhone to open up your Contacts. Click on the plus sign + to add a new contact and touch the Name Field. Don’t put the name of your contact in this field, only the word ICE.  If you have more than one ICE Contact, just name the first contact ICE1 and the second ICE2.  
Now touch the Company Name Field. Here is where you put your contact’s name and his or her relationship to you. For example, John Jones â€" Husband. That way a doctor or nurse reading it, will know that this contact is your husband. Â
Even if you already have a contact for this person in your phone, set up this ICE Contact separately. That way you can put the information into it, that needs to be there, along with a special graphic, so that emergency personnel will know that these people are your chosen ICE Contacts, without having to guess.Â
There’s a very important reason that we’re setting it up this way, but we’ll get to that in a moment.

Time To Make Your iPhone Do Some Heavy Lifting…
Here’s the basic information you need to include:
♦ Your emergency contact’s main phone number, mobile number and work number.
♦ Email Address & IM, Twitter or Facebook address (these are vital in case you need to send that contact an emergency message or quick update).
♦  Your contact’s schedule if there are specific days that he or she is different locations.
♦ Be sure to include every piece of information you can.  Why? When people are injured in a regional emergency, like a tornado or an earthquake, not every type of communication will be working. For instance, after the Japan earthquake, many people were able to reach each other via Twitter or Facebook even though their landlines and Wi-Fi weren’t working.

Like most smartphones, your iPhone lets you change, add or create fields inside the contact, so that you can customize it as much as you like. In general, all you need to do is touch and hold the name of the field that you want to change. This will bring up a menu of alternate field names to choose from, including the option to Create A Field and add whatever you need.

Now For Your Medical ID
On your home screen click on the Health App â€" it’s the one with the heart on it. This will take you to the Dashboard page of the Health App. On the bottom right of the screen, you’ll see the Medical ID icon. Click on it. Â
And you’ll be taken to the Medical ID screen. Click on the red link that says Create Medical ID.Â
The most important part of the Medical ID screen is at the top. It’s the On/Off Switch that shows a link to your emergency information on the home screen of your phone even when it’s password-locked. Before you do anything else, switch this to the ON position. It will turn green like the graphic below.Â
By the way, none of the information in your Medical ID is shared with any of the other apps on your phone.

Enter All Of Your InformationÂ
Put all the information you possibly can into your Medical ID. Â
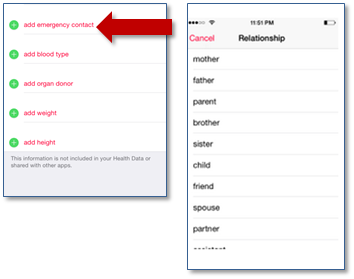
As you can see it already has fields for your birthdate, medical conditions, allergies, current medications and other information. There are two sections that you need to pay special attention to â€" Medical Notes and Add Emergency Contact.Â
After you finish filling in the regular fields, use the Notes Section to list anything that didn’t fit into them, like the names and phone numbers of your physicians and healthcare providers and contact information for your Insurance Company. Just don’t put any sensitive personal information into your Medical ID like your social security number, insurance member ID number or financial information.  Â
You can also place a link to your Medical History Form in the Notes Section to give emergency personnel to quick access to your medical history until your emergency contact arrives at the hospital.Â

Add Your Emergency ContactÂ
When you click on Medical ID’s Add Emergency Contact button, it will show you a list of your contacts, so you can choose the people you’d like to add to your Medical ID. That’s why we had you set up your ICE Contacts first. Â
Go ahead and click on the button and choose your first ICE Contact. You can also add a relationship to the contact to let emergency personnel whether the contact is a spouse, parent or a friend. Â
If you have additional ICE Contacts (yes we are trying to hammer this point home!) then click on the Add Emergency Contact field again to add as many additional people as you would like.
What About Your Medical History?Â
Need more than just a few lines to communicate your medical history? Then create a medical history form [1] and store it to a password protected online folder & place a link to the form into the Notes Section of your Medical ID. This way a doctor can access your, your spouse’s or your kids basic medical history, while you’re en route to the hospital.  Oh and if you don’t have a form, just download ours by clicking on the link above.
Â
By the way, don’t forget to make emergency cards [2] for your family too. Download them here [3] , and tuck them into their wallets with their ID, just in case their mobile phones can’t be accessed after an accident or regional emergency.
Let’s Make Sure No One Misses It!
Make your ICE contacts stand out by using the Add Photo function to upload a graphic like this one.

You can either make your own graphic or we have free ones you can use by downloading our free ICE My Phone Kit [4] .  Â

What About The Rest of The Family?
Every family has one person who keeps everyone else organized. And since you’re reading this post, something tells me it’s probably you!Â
If that’s the case, it’s up to you to ensure every member of your household not only has ICE Contacts set up on his or her phone, but that everyone’s phone contains all of the contact information for every other family member. That way you’ll be able to get in touch with each other as quickly as possible in an emergency.
And don’t forget that you can always put an ICE Contact in your family’s iPod Touches or other devices as well. Just because you don’t have a phone with you while you’re running doesn’t mean you can’t stay safe!
What If Your Phone Is Password Locked?
With Medical ID, there are now two ways for emergency personnel to grab your ICE Contact information even if your iPhone is password locked.Â
The first? Now that you turned your Medical ID on, an emergency link to it now appears on the lock screen/home screen of your phone.  All a hospital has to do is click on that Emergency link, which will open your Health App and Medical ID. The emergency link will also allow you to make an emergency call without having to stop to unlock your phone first.  Â
One other way that emergency personnel can locate your ICE Contact is with a little help from Siri.Â
Remember we had you put nothing but the word ICE in the Name field of your ICE Contact? All an Emergency Room has to do is Press and Hold Down the Main Home Key on your phone to access Siri and then say, “Contacts ICEâ€.  Siri will then display all the information you have saved as ICE. Â
If you place any other words in the name field besides ICE, your phone will sort it differently and Siri won’t recognize the contact as ICE.Â
And with Medical ID, emergency personnel can also press and hold down the Home Key, then say to Siri, “Health,†which will open the Health App so that they can view your Medical ID. Â
Remember, if someone is looking for your ICE Contact, you may be unconscious and unable to communicate medical information for yourself.  In fact, if you do tend to password lock your phone, you should definitely put vital medical information like allergies or chronic illnesses into the Notes Section of your Medical ID as well, just in case the ICE contact is the only contact on your phone that medical personnel can access.
And if you’re a healthcare professional, remember these instructions the next time you encounter an unconscious patient with a locked iPhone. Press and hold down the main home key to access Siri and say “Contacts ICEâ€. You never know. That one little question might just uncover all of the information you need to save their life!

Turn Your Phone Into A Mobile Command Center
While you’re at it, you can even turn your phone into a Mobile Command Center. Just store copies of your family’s medical history forms, emergency action plans, checklists and Evacuation Plan [5] , right on your phone and those of each member of your immediate family. Â
And while you have them, don’t forget to put ICE Contacts on their phones as well, including along with each other’s contact information.   That way you can all get in touch with each other quickly in an emergency.  And don’t forget to download our free ICE My Phone Kit [6]  and follow the instructions to set up your family’s ICE Contacts, no matter what phone they have.  Â

Do yourself a favor. Take five minutes right now to set up your family’s ICE contacts. That way your family will have all the information they need to stay safe and secure, no matter what the situation.  Talk about peace of mind!
_____
Graphics for the iPhone 6 and Medical ID courtesy of our friends at Best Buy.  We’d like to thank their team of mobile communications experts for all of their help and support.
What’s Next?  Well now that you’re done ICEing your phone, you can…
- ICE your spouse’s and kid’s phones and iPods.
- ICE your parents phones.
- Share this How-To with your friends and family â€" #ICEmyphone.
- Make Emergency Wallet Cards (they’re in the download file)
- Shoot a quick picture or video of you and your family ICEing your phones and share it on Twitter [7] , Facebook [8] , Pinterest [9] or You Tube [10] with the hash tag #ICEmyphone. Be sure to watch our social media, because we’ll feature the best ones every month!Â
Here are More Amazing Things You Can Do In 5 Minutes Or Less
Create Your Family’s Evacuation Plan
Download and Back Up Your Digital Photos
Keep Your Medical History At Your Fingertips
Save Your Albums & Cassettes As MP3s
Fill Out Your Kid’s Emergency Contact Card
Â


This is just a fraction of the tools and resources you’ll find in our latest book “ Get Your Stuff Together ,†now available on Amazon.com for $24.99. Over 200 pages packed with the info you and your family need to keep everything that’s important to you â€" photos, music, videos, data and keepsakes â€" safe from life’s little and not so little emergencies.  Pick up your copy today [11] for $24.99 at Amazon.com [12] .
 In our bookâ€Keep [13] This Book In Your iPhone [14]  †we’ve squeezed all of the information you need to turn your iPhone, Samsung Galaxy or any other smartphone into a real life saver. A few minutes with this book, and you’ll know how to stash all of your vital information, backed up photos, family emergency plans and contacts in your phone, where they’ll be at your fingertips, ready to help you through life’s little speed bumps. Like Superstorm Sandy.   Pick up your copy today [15] for $12.95 at Amazon.com [16] .
Links
- ^ medical history form (www.collegestuf.com)
- ^ emergency cards (www.collegestuf.com)
- ^ Download them here (www.collegestuf.com)
- ^ downloading our free ICE My Phone Kit (www.getyourstufftogether.com)
- ^ Evacuation Plan (www.collegestuf.com)
- ^ ICE My Phone Kit (getyourstufftogether.com)
- ^ Twitter (www.twitter.com)
- ^ Facebook (www.facebook.com)
- ^ Pinterest (www.pinterest.com)
- ^ You Tube (www.youtube.com)
- ^ Pick up your copy today (www.amazon.com)
- ^ Amazon.com (www.amazon.com)
- ^ Keep (www.amazon.com)
- ^ This Book In Your iPhone (www.amazon.com)
- ^ Pick up your copy today (www.amazon.com)
- ^ Amazon.com (www.amazon.com)
No comments:
Post a Comment